Media Tool #1 - Canva.com
https://vimeo.com/181978126
| media_tool_1.pdf |
Media Tool #1 - Reflection on the Process & Product
The first media tool with which I experimented was Canva.com – a drag and drop website with features that results in professional looking and visually appealing designs and graphics. The layouts, images, icons and shapes, and fonts make for an easy to use and extensively available site. The graphic which I created was made with the aims of a poster that highlighted key components of the video by Suzanne de Castelle, for New Media Modules, titled The Pedagogies of Production. I am one to always take notes when watching videos for school, but this time, I wondered how much more I’ll understand and remember from the topic if I made a product relaying the knowledge and information I’ve attained. I suppose for me, this was a secondary step: the first was always taking notes and leaving it there, only to return when needed, but this second step allowed me to work with my notes, think of ways to represent it, think of the most important concepts, and make connections between the concepts. In creating a poster of this video, I was able to move from a passive note taking position to a more active creating role. I guess this is what constructionism is really about! The overall product is something I am proud of and only wish was more interactive (perhaps having clickable links or GIFS) that will add another dimension to this poster. Purposeful making, a concept that was highlighted in the video, is exactly what I think I have achieved in creating this poster – the information was presented in one construct and I was able to rethink the information, condense it with regards to what I considered to be of value and of importance, and present that concise information in a new medium.
The first media tool with which I experimented was Canva.com – a drag and drop website with features that results in professional looking and visually appealing designs and graphics. The layouts, images, icons and shapes, and fonts make for an easy to use and extensively available site. The graphic which I created was made with the aims of a poster that highlighted key components of the video by Suzanne de Castelle, for New Media Modules, titled The Pedagogies of Production. I am one to always take notes when watching videos for school, but this time, I wondered how much more I’ll understand and remember from the topic if I made a product relaying the knowledge and information I’ve attained. I suppose for me, this was a secondary step: the first was always taking notes and leaving it there, only to return when needed, but this second step allowed me to work with my notes, think of ways to represent it, think of the most important concepts, and make connections between the concepts. In creating a poster of this video, I was able to move from a passive note taking position to a more active creating role. I guess this is what constructionism is really about! The overall product is something I am proud of and only wish was more interactive (perhaps having clickable links or GIFS) that will add another dimension to this poster. Purposeful making, a concept that was highlighted in the video, is exactly what I think I have achieved in creating this poster – the information was presented in one construct and I was able to rethink the information, condense it with regards to what I considered to be of value and of importance, and present that concise information in a new medium.
Media Tool #2 - Storybird
My Media Tool #2 was Storybird – a platform used to create stories, chapter books or poetry. The technicality of each one is slightly different and I chose to create a poetry piece. I use the plethora of images available on the site, get inspired by it and create a poem. I selected an image and then a set of words appeared. I was able to look through the words and found the first set didn’t really fit the image I had chosen, so I refreshed for a new set of words. This second set was easier to work with and allowed me to create the poem above. For stories and chapter books, the content (writing) is based on the creator, however, the poem is created through a recycle of words that come up and the user selects and mixes the words to create free-form and flow poetry. The drag and drop function was easy to navigate and use and there was the option of refreshing the words to generate new sets…this would of course lead to the creation of a another poem entirely. Overall, this is a good tool for a teacher to have, especially as it offers a lot in terms of creating digital books and poems. The Storybird website boasts “We use illustrations to inspire students to write stories: picture books for K-5, long form chapter books for Grades 5-9, and poetry for everything in-between” but I certainly think the age restriction is only a suggestion, as anyone can use the tools for any use. Students can easily use storybooks from K-12 and throughout different curriculums to write a story or explain a concept. They can collaborate or work independently and the creativity has no limit.
Media Tool #3 - ScribJab
STORY TITLE: A Thirsty Crow
Using ScribJab as media tool #3 was certainly a great experience. I think that this is by far one of my favourite applications and I can definitely see myself using it in the future as a teacher. I only wish I had known about it sooner so that I could have created great bilingual projects in my placements. ScribJab is a multi-language storytelling app and website for kids aged 10-13 (but this is for everyone in my opinion!) and is a very innovative and easy to use system. While working on my story, I predominantly used my IPad as I found I had more control and it was easier to access and do things. When drawing images, it was a lot easier to use my finger on an IPad as opposed to a non-touch computer. As well, because I was using English and Tamil as the languages for my story, I needed to use the Tamil keyboard extension I had; however, this was very difficult to navigate on my computer. I switched over to my IPad and found it was a lot easier switching between the languages and typing out the story. I decided to use an old moral story shared with kids that I heard growing up – as it would be short and allowed me to translate without problems. Of course, this app and website allows, and primarily encourages, the creation and sharing of kids’ own stories. They are able to draw their own illustrations, write in whichever languages they are comfortable, and also read and record their stories. This activity alone combines reading, writing, and oral communication not to mention art if a teacher wanted to use it as a cross-curricular lesson. Its use in the classroom undoubtedly supports and encourages language learning and writing, but also helps take language learning home, especially in ELL families. ScribJab is ultimately a tool of digital literacy collaboration and the creation of dual language books helps learners of all abilities in language learning.
Using ScribJab as media tool #3 was certainly a great experience. I think that this is by far one of my favourite applications and I can definitely see myself using it in the future as a teacher. I only wish I had known about it sooner so that I could have created great bilingual projects in my placements. ScribJab is a multi-language storytelling app and website for kids aged 10-13 (but this is for everyone in my opinion!) and is a very innovative and easy to use system. While working on my story, I predominantly used my IPad as I found I had more control and it was easier to access and do things. When drawing images, it was a lot easier to use my finger on an IPad as opposed to a non-touch computer. As well, because I was using English and Tamil as the languages for my story, I needed to use the Tamil keyboard extension I had; however, this was very difficult to navigate on my computer. I switched over to my IPad and found it was a lot easier switching between the languages and typing out the story. I decided to use an old moral story shared with kids that I heard growing up – as it would be short and allowed me to translate without problems. Of course, this app and website allows, and primarily encourages, the creation and sharing of kids’ own stories. They are able to draw their own illustrations, write in whichever languages they are comfortable, and also read and record their stories. This activity alone combines reading, writing, and oral communication not to mention art if a teacher wanted to use it as a cross-curricular lesson. Its use in the classroom undoubtedly supports and encourages language learning and writing, but also helps take language learning home, especially in ELL families. ScribJab is ultimately a tool of digital literacy collaboration and the creation of dual language books helps learners of all abilities in language learning.
Media Tool #4 - Hopscotch
https://c.gethopscotch.com/p/yl3ja4mx2
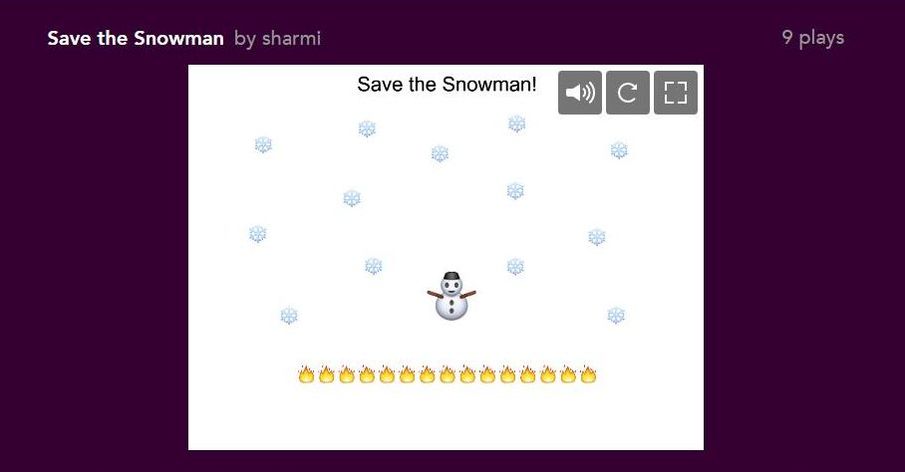
My experience with Hopscotch yielded a whole range of emotions! I was at first very anxious to experiment with this medium of coding, then I was intrigued to see how students may learn and approach it and finally, I was proud of my little game. The project that I created with Hopscotch was a little game called “Save the Snowman”. It is a simple game where the player must keep tapping in order to keep the snowman afloat and away from the line of fire underneath. It was a process to understand how to make the snowman move in the way that I wished, but the embedded tutorials on the app made it easier to follow along. The only thing I wish that I was able to do is add in a background of my choice without having to pay extra fees. A lot of the coding is attainable if a student follows the direction or simply plays around with the app. I think that as a teacher I might let kids begin to explore coding through this easily accessible medium, and also make sure female students get the exposure to this area of technology. I can also see how this app can be used in language arts to help students with procedural writing. Students will be able to give steps on how to create a game or how to play it – making it an interactive lesson overall. As discussed in class last week, girls are often deterred from coding and I hope that this introduction in class, with its simple instructions to follow will help female students develop an interest in coding. I, myself, will probably return to this app in the spring once I am done my courses to experiment and create other games. The experience shall continue!
My experience with Hopscotch yielded a whole range of emotions! I was at first very anxious to experiment with this medium of coding, then I was intrigued to see how students may learn and approach it and finally, I was proud of my little game. The project that I created with Hopscotch was a little game called “Save the Snowman”. It is a simple game where the player must keep tapping in order to keep the snowman afloat and away from the line of fire underneath. It was a process to understand how to make the snowman move in the way that I wished, but the embedded tutorials on the app made it easier to follow along. The only thing I wish that I was able to do is add in a background of my choice without having to pay extra fees. A lot of the coding is attainable if a student follows the direction or simply plays around with the app. I think that as a teacher I might let kids begin to explore coding through this easily accessible medium, and also make sure female students get the exposure to this area of technology. I can also see how this app can be used in language arts to help students with procedural writing. Students will be able to give steps on how to create a game or how to play it – making it an interactive lesson overall. As discussed in class last week, girls are often deterred from coding and I hope that this introduction in class, with its simple instructions to follow will help female students develop an interest in coding. I, myself, will probably return to this app in the spring once I am done my courses to experiment and create other games. The experience shall continue!
